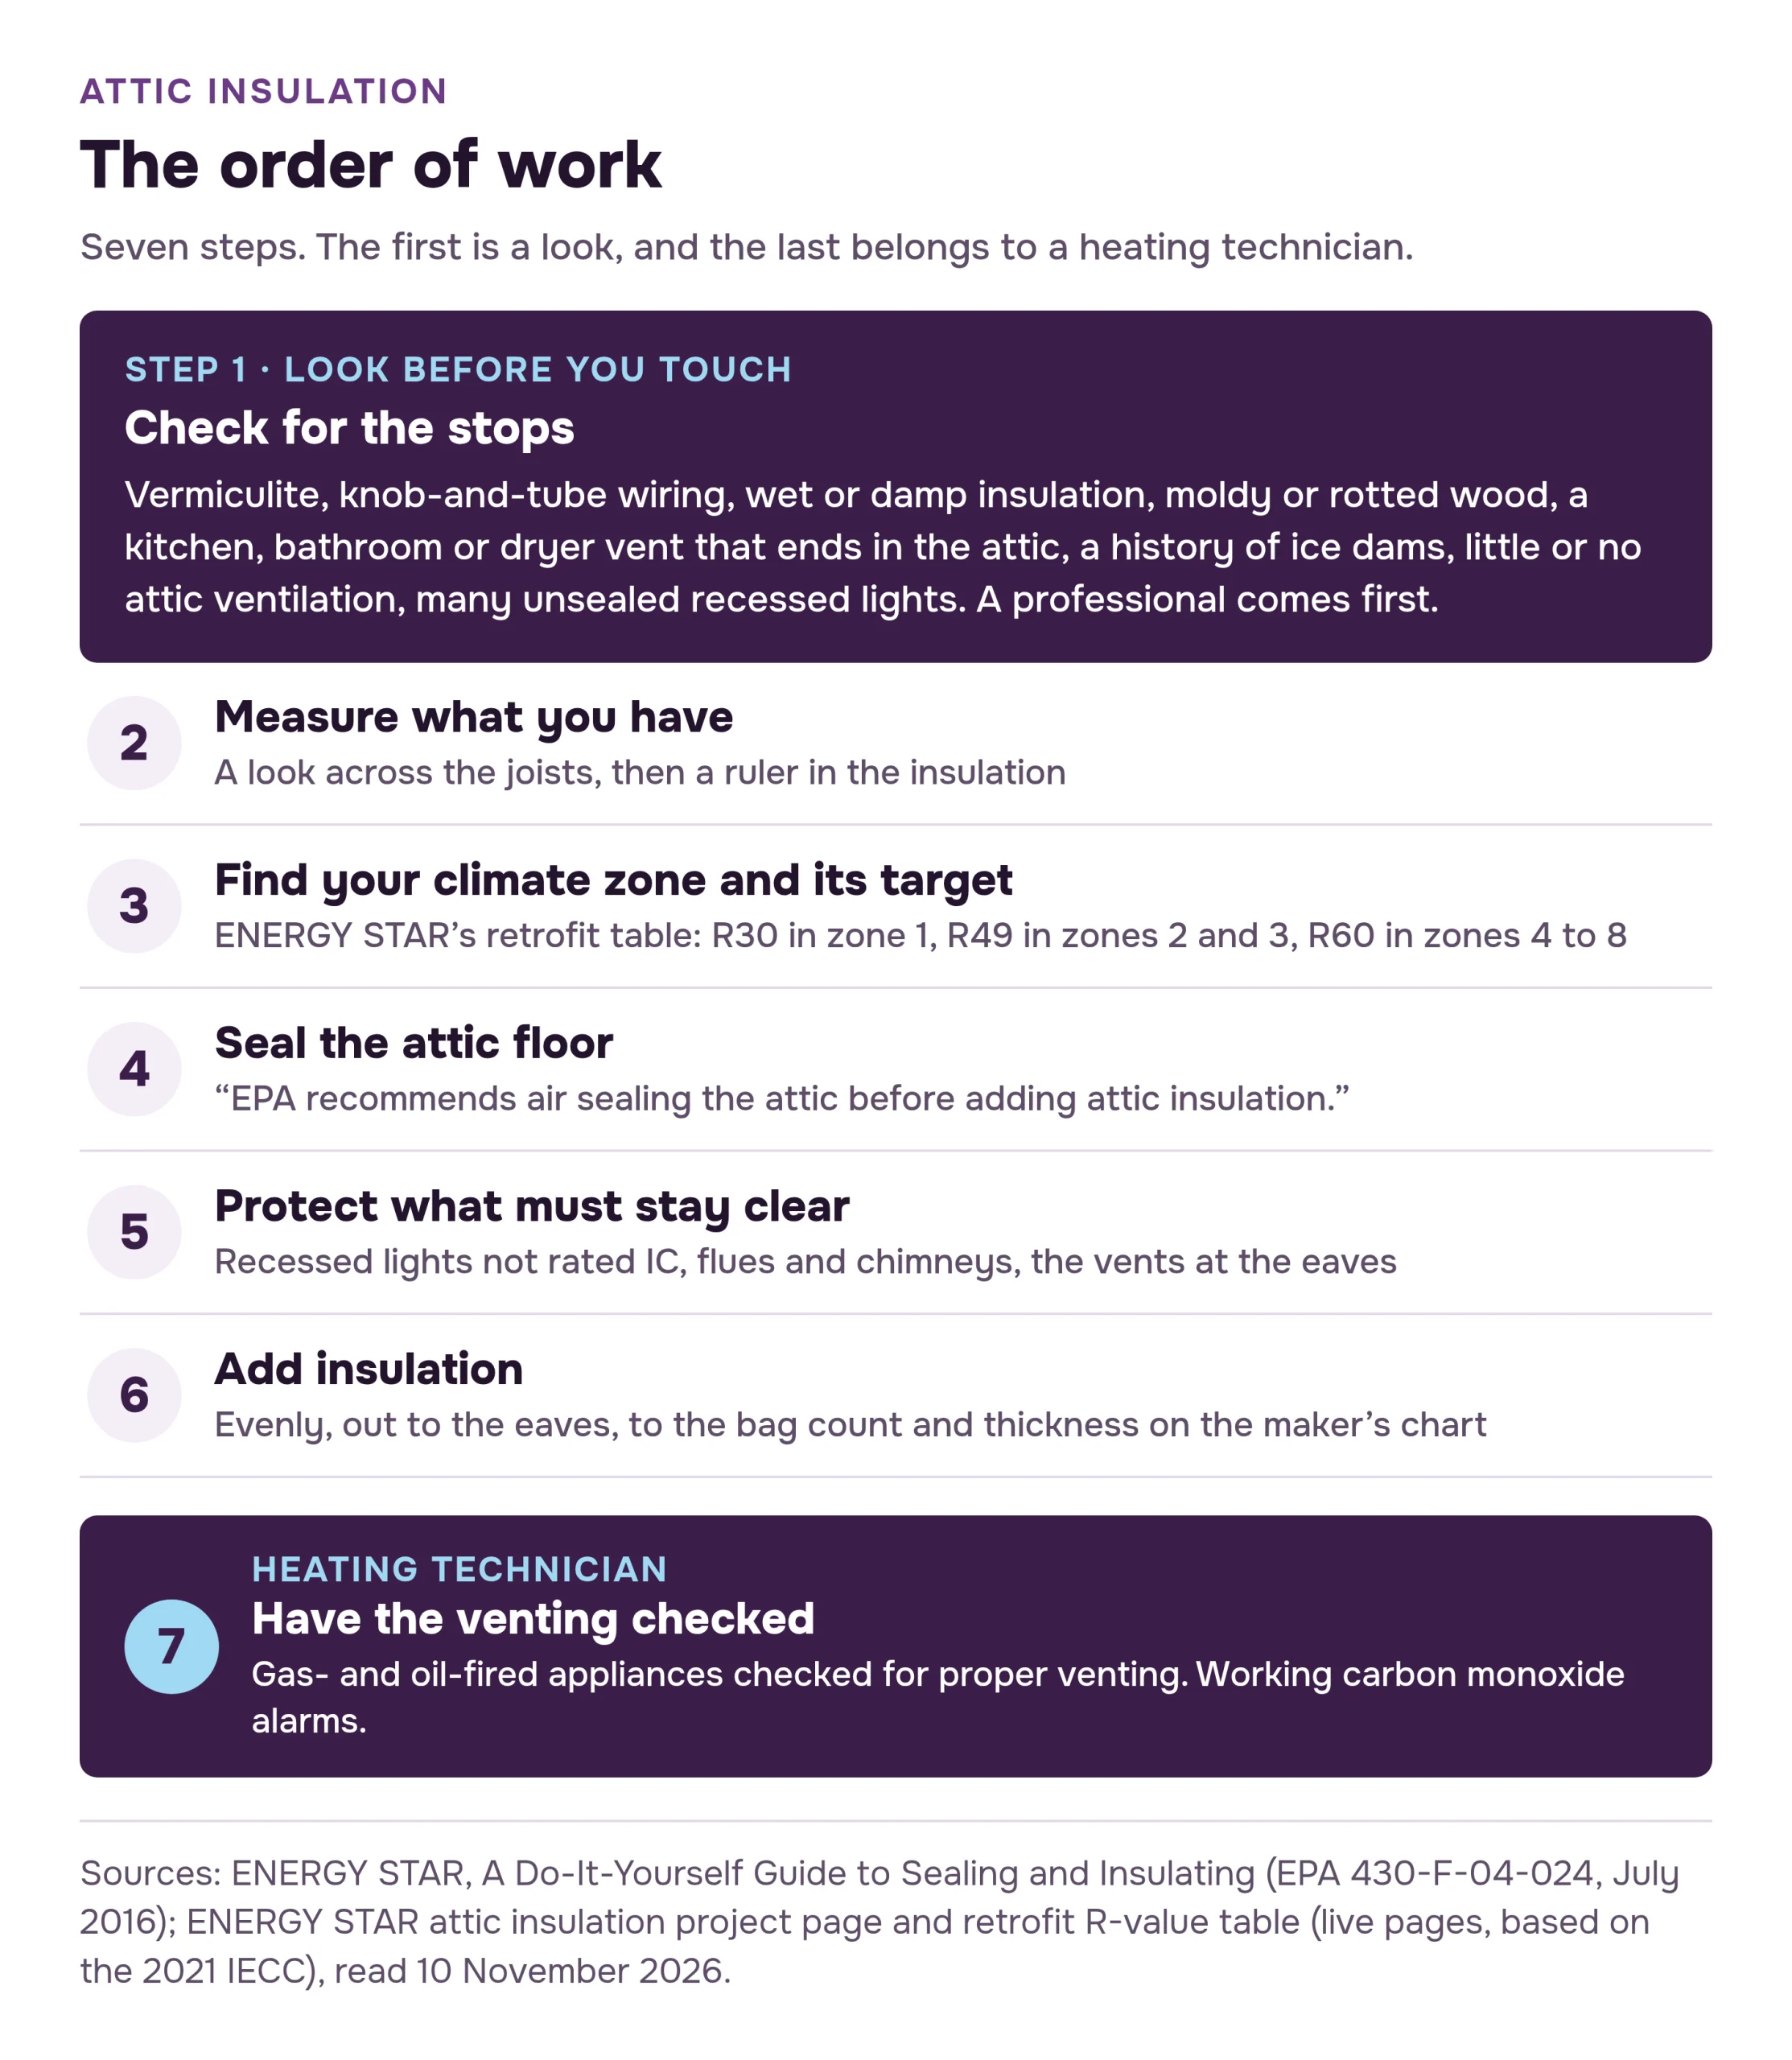
Most attics need work in this order: look for the things that stop the job, measure what is there, find your climate zone and its target, seal the air leaks in the attic floor, protect the lights, flues and eave vents, and only then add insulation. For an attic with no insulation, ENERGY STAR’s retrofit table gives R30 in climate zone 1, R49 in zones 2 and 3, and R60 in zones 4 to 8. R-value is a material’s resistance to heat flow: the higher the number, the more it insulates. This is the starting page of our attic guides, and each step below links to the page that covers it fully.
General information, not professional advice. Building codes are adopted locally, with changes, and your building department decides what applies to your house. Stop and call a qualified professional for anything this page marks as a stop.
How to insulate an attic: the order of work
- Look before you touch. Some findings mean the attic needs a professional first. The list is in the next section.
- Measure what you have. A look across the joists, then a ruler in the insulation.
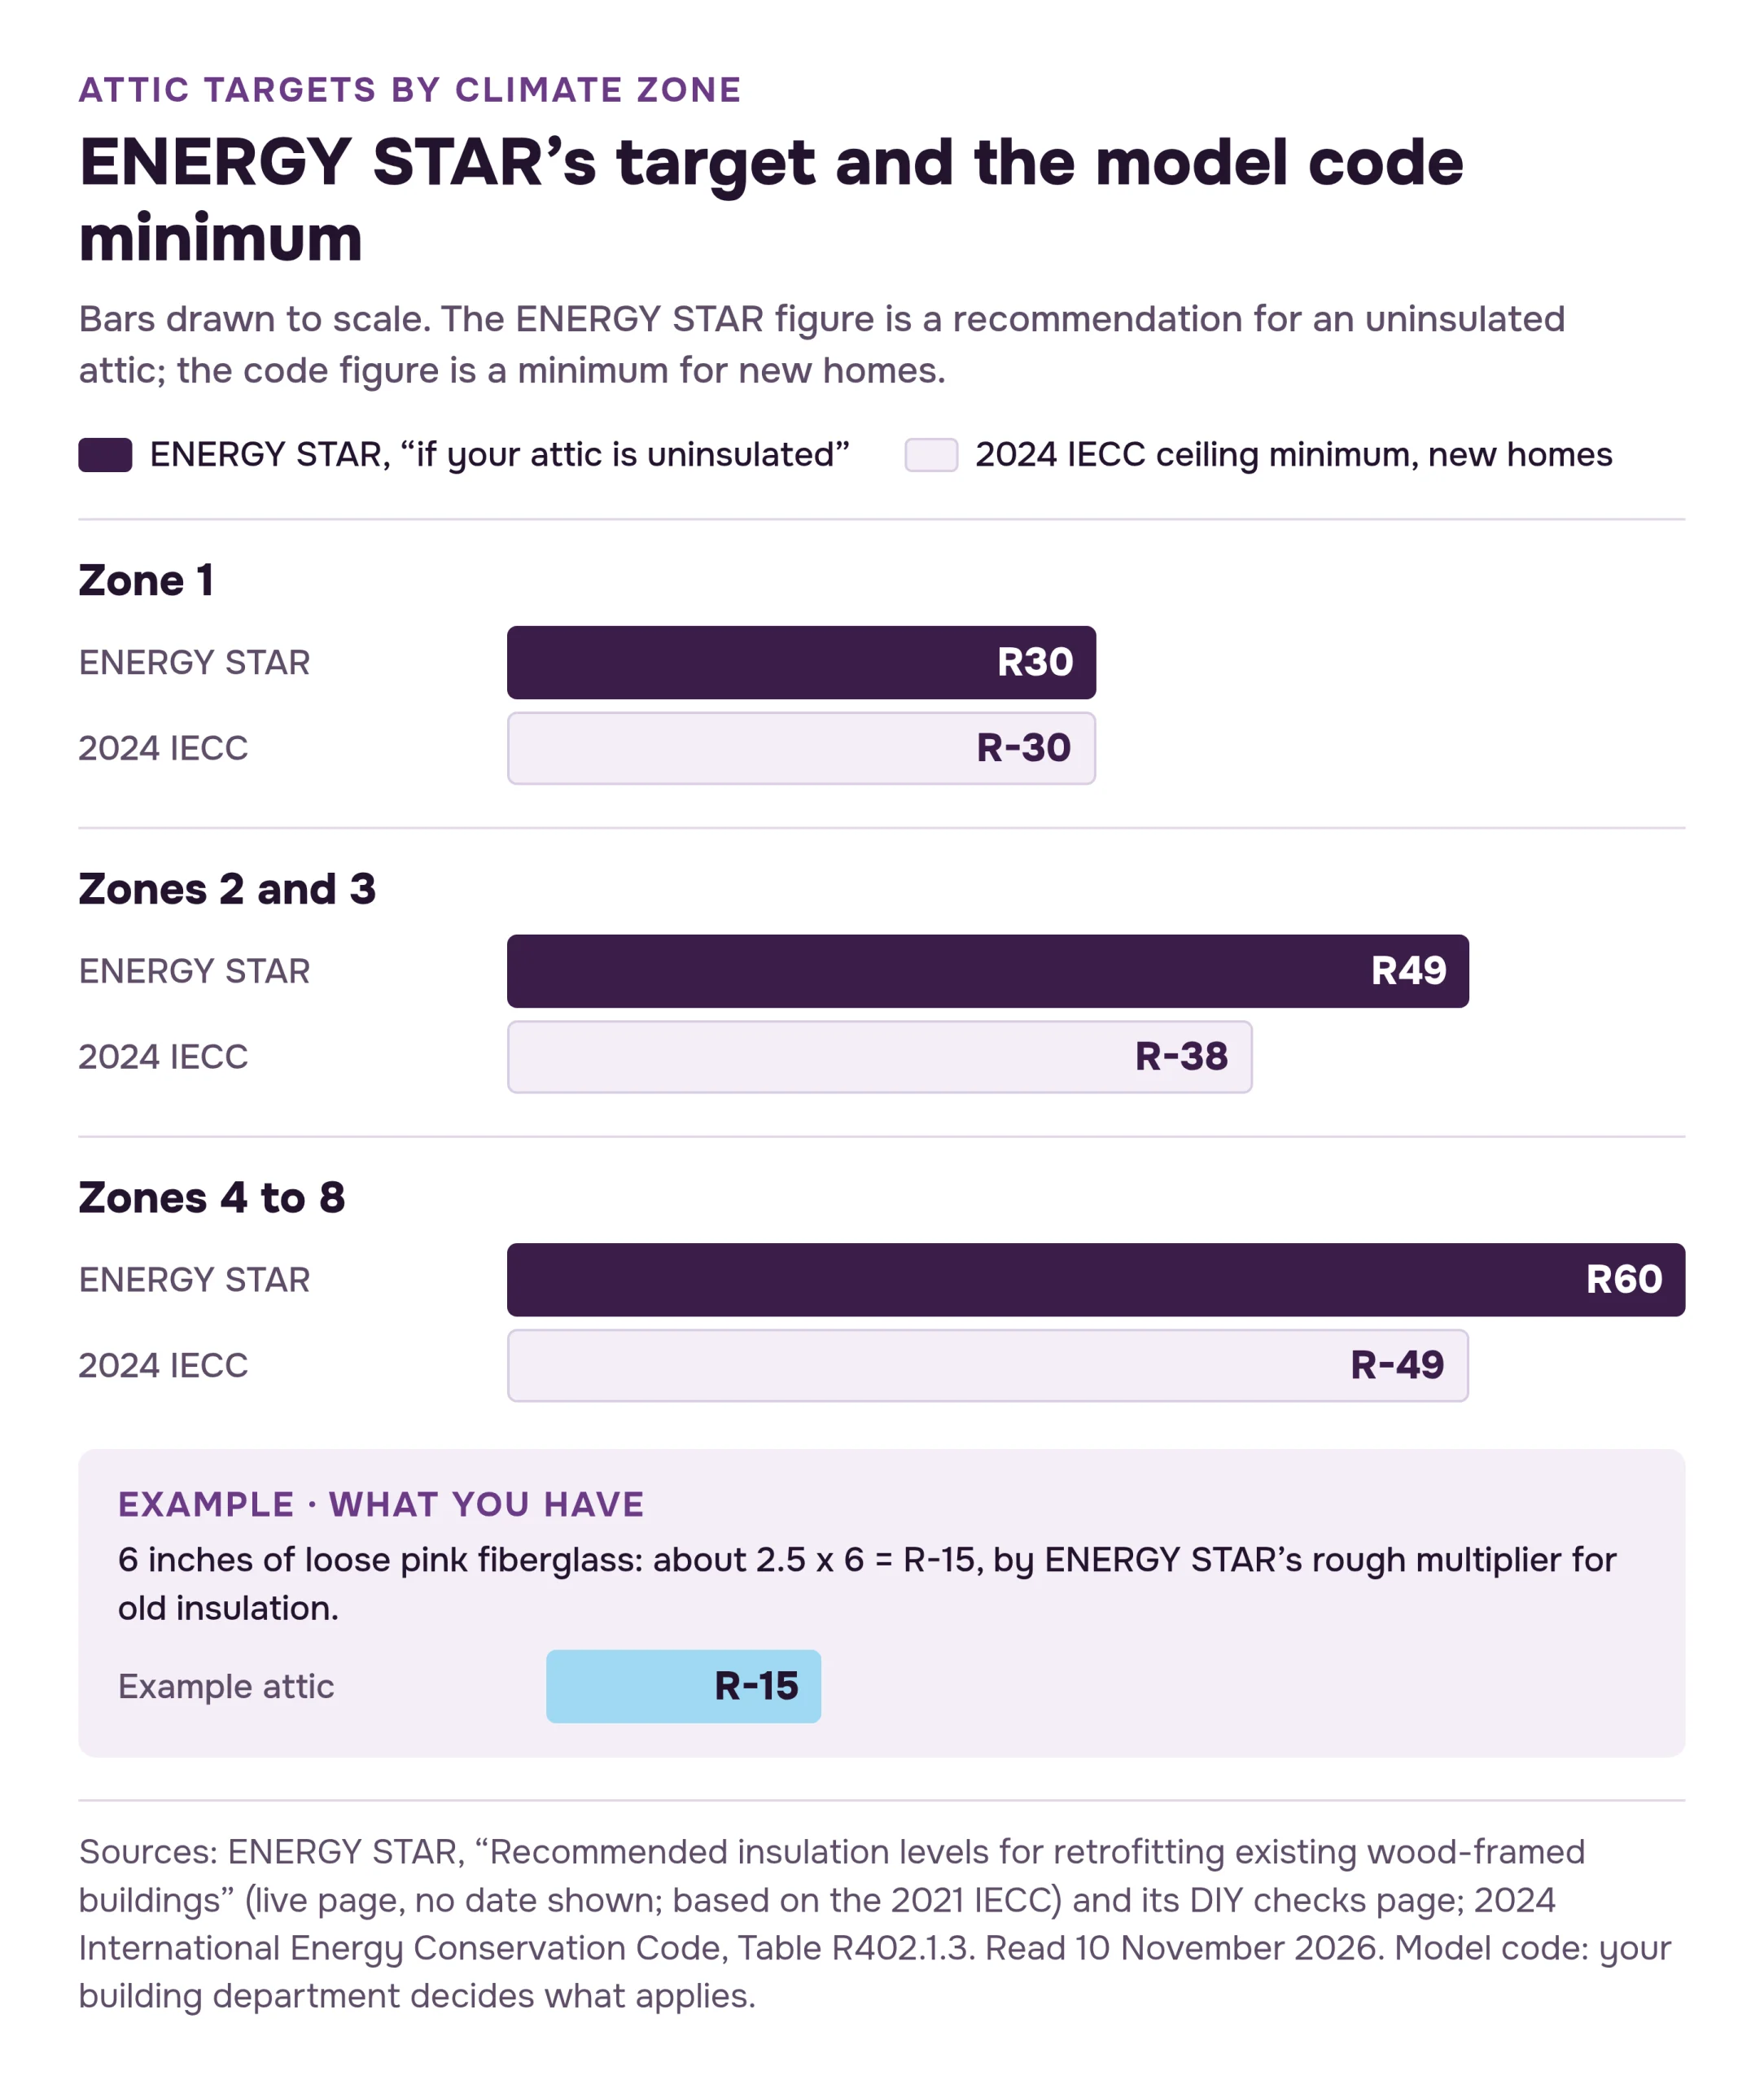
- Find your climate zone and its target. ENERGY STAR’s retrofit table is the target on this site. The model energy code’s minimum for new homes is lower, and we show both.
- Seal the attic floor. ENERGY STAR’s attic insulation page says: “EPA recommends air sealing the attic before adding attic insulation.” Once new insulation is down, the leaks are buried under it.
- Protect what must stay clear. Recessed lights that are not rated for insulation contact, flues and chimneys, and the vents at the eaves.
- Add insulation, evenly, out to the eaves, to the bag count and thickness the maker’s chart gives (our R-value to inches lookup lists the thickness by product).
- Have the venting checked. After a house is tightened, a heating technician checks that gas and oil appliances still vent properly, and the house keeps working carbon monoxide alarms.
Stop first if you find these
ENERGY STAR calls attic air sealing and insulating do-it-yourself projects “if your attic is accessible and not too difficult to move around in”. Its do-it-yourself guide (EPA 430-F-04-024, July 2016) and its attic insulation project page list the conditions to have a professional correct before you go further:
- Wet or damp insulation, which ENERGY STAR reads as a sign of a leaky roof.
- Moldy or rotted rafters or floor joists, a sign of a moisture problem. Our page on mold and condensation in the attic covers the causes.
- Kitchen, bathroom or clothes dryer vents that end in the attic instead of outdoors.
- A history of ice dams, which the guide calls “an indication of serious air leaks”. See what causes ice dams.
- Little or no attic ventilation.
- Knob-and-tube wiring (ENERGY STAR dates it “pre-1930”), “which can be a fire hazard when in contact with insulation”. Don’t insulate over or around it. A licensed electrician comes first: see knob-and-tube wiring and insulation.
- Many unsealed, uninsulated recessed “can” lights. The guide says “special care must be taken when insulating around these fixtures”.
- Difficult access and little room to work (on the project page’s list).
Vermiculite is a stop of its own. It is a pebble-like, pour-in insulation, “usually gray-brown or silver-gold in color”, in EPA’s description. EPA says: “YOU SHOULD ASSUME THE VERMICULITE CONTAINS ASBESTOS AND DO NOT DISTURB IT!” Leave it undisturbed, don’t store boxes or other items in that attic, don’t let children play there, and “Do not attempt to remove the insulation yourself.” If work would disturb it, EPA says to hire a professional asbestos contractor. That means no measuring with a ruler, no raking it level and no blowing new insulation over it yourself.
ENERGY STAR’s pages say not to disturb vermiculite “unless you have had it tested by an approved lab”. EPA’s asbestos page is the stricter of the two, and this site follows it: EPA says further testing “is not necessary to take the appropriate precautions”, and that a test can be expensive and may give wrong results. More on our vermiculite insulation page.
Measure what you have
ENERGY STAR’s cautions for any trip into the attic: walk on the joists or truss chords, never on the exposed ceiling drywall or the insulation; watch for roofing nails coming through the roof deck; wear a dust mask or respirator, safety glasses and gloves; take a good light; and in hot weather go up early, because attics heat up through the day.
The joist test. Look across the attic floor. The DIY guide’s rule: “If your insulation is just level with or below your floor joists (i.e., you can easily see your joists), you should add more. If you cannot see any of the floor joists because the insulation is well above them, you probably have enough and adding more may not be cost-effective.” Check that it is even, too. The guide notes that there is sometimes enough in the middle of the attic and very little along the eaves.
The ruler. For a number, read the R-value printed on the batts if there is one, or measure the depth in inches in a few places and multiply by ENERGY STAR’s figure for what you see (from its DIY checks page, read 10 November 2026):
| What you see | What it probably is | Estimated R-value |
|---|---|---|
| Loose fibers, lightweight, yellow, pink or white | Fiberglass | 2.5 x depth in inches |
| Loose fibers, dense, gray or near white, may have black specks | Rock wool | 2.8 x depth |
| Loose, small gray flat pieces or fibers (from newsprint) | Cellulose | 3.7 x depth |
| Batts, lightweight, yellow, pink or white | Fiberglass | 3.2 x depth |
| Lightweight granules | Vermiculite or perlite | Don’t measure it. See the stop above |
An example: 6 inches of loose pink fiberglass is about 2.5 x 6 = R-15. These multipliers are rough estimates for old insulation. They are not a way to rate new insulation, which is sold by the R-value on its label. Our how much insulation do I need tool does this sum for your zone and shows the gap.
Attic insulation R-value: your zone and target
The targets depend on your climate zone, a number from 1 (hottest) to 8 (coldest) that the energy codes assign county by county. Zone 4 is split: 4C is the marine zone, which in PNNL’s county list covers much of western Oregon and Washington and two northern California counties; 4A and 4B are the rest. The county list is in a Pacific Northwest National Laboratory guide (PNNL-33270, September 2022), and our tool lists the zones found in each state.
| Climate zone | ENERGY STAR: “If your attic is uninsulated” | ENERGY STAR: “If you already have 3–4 inches of insulation” | 2024 IECC ceiling minimum, new homes |
|---|---|---|---|
| 1 | R30 | R25 | R-30 |
| 2 | R49 | R38 | R-38 |
| 3 | R49 | R38 | R-38 |
| 4A and 4B | R60 | R49 | R-49 |
| 4C, 5 and 6 | R60 | R49 | R-49 |
| 7 and 8 | R60 | R49 | R-49 |
How to read it:
- ENERGY STAR’s figures are recommendations, the levels it calls “cost-effective” for existing homes. They are not a rule anyone enforces on your attic.
- The two ENERGY STAR columns sit under one heading, “Add Insulation to Attic”. ENERGY STAR does not say whether the second column is a total to reach or an amount to put on top of the 3 to 4 inches. We print it as ENERGY STAR does. Our tool uses the first column as the target and shows “target minus what you have” as its own arithmetic.
- The code column is a minimum for new construction in the 2024 model code. States and cities adopt their own edition, often with changes, and it may be an older one. Whether any of it applies to work on an existing attic is for your building department to say. In the model code, R-30 may stand in for R-38, and R-38 for R-49, where that insulation covers the whole ceiling and runs at its full, uncompressed depth over the top of the outside walls at the eaves (section R402.2.1, 2024 edition).
Why you see R-38, R-49 and R-60
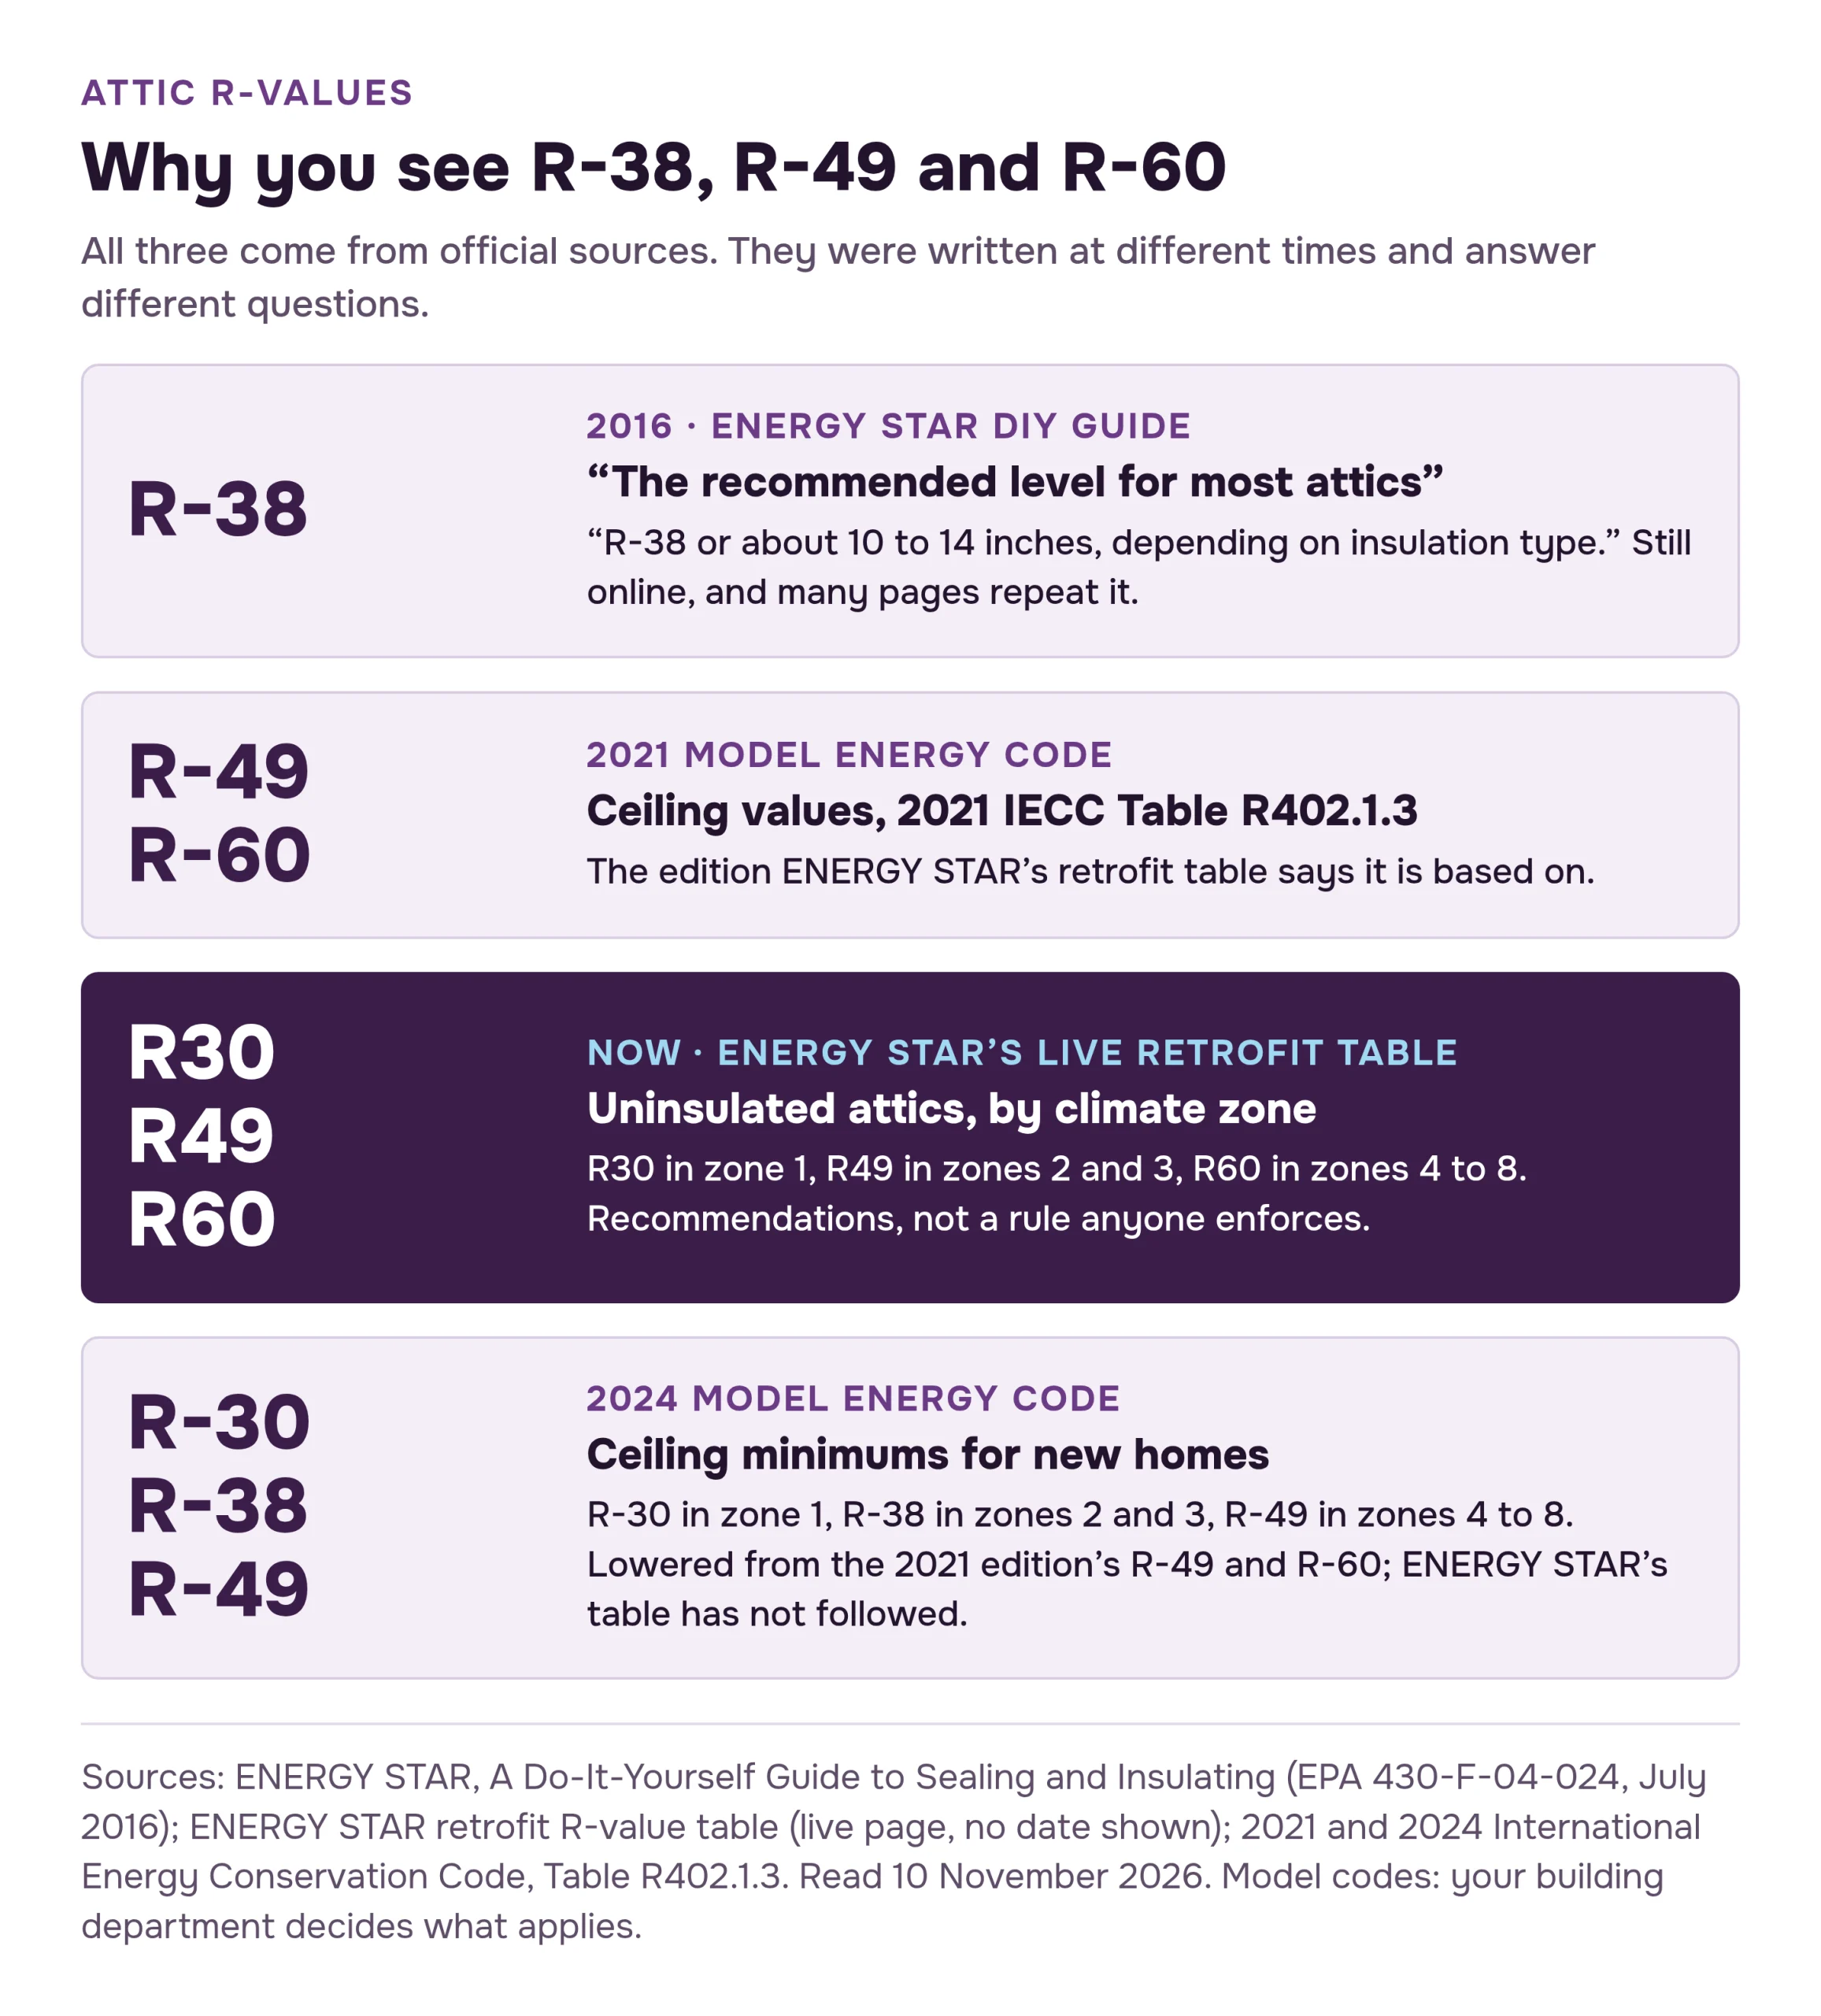
All three numbers come from official sources. They were written at different times and answer different questions.
- R-38 is in ENERGY STAR’s own 2016 DIY guide: “The recommended level for most attics is to insulate to R-38 or about 10 to 14 inches, depending on insulation type.” The guide is still online, and many pages repeat it. ENERGY STAR’s live table has moved on to R49 and R60 for every zone but zone 1.
- R-49 and R-60 for uninsulated attics are the ceiling values of the 2021 model energy code (2021 IECC, Table R402.1.3), which ENERGY STAR’s retrofit table says it is based on and matches zone for zone.
- R-38 and R-49 again are the 2024 model code’s ceiling minimums for new homes, lowered from the 2021 edition’s R-49 and R-60. ENERGY STAR’s table has not followed that change.
- Ranges such as “R30 to R60” or “R49 to R60” come from two other tables: one on ENERGY STAR’s DIY checks page, which doesn’t match its retrofit table, and one on a U.S. Department of Energy page that is no longer on energy.gov (DOE, archived 22 June 2026; the live page was removed).
So a page that says “R-38 is the recommended level” is quoting the 2016 guide, not the current table.
Seal the attic floor first
Insulation slows heat passing through the ceiling. It does little to stop air: warm air from the house rises through holes in the attic floor and goes straight through loose fill or batts. ENERGY STAR’s guide says that in most homes the most significant air leaks are hidden in the attic and basement, and that “Even if you have enough insulation in your attic, sealing attic air leaks will enhance the performance of your insulation”.
Its order is to “Plug the Big Holes First”: open stud cavities where walls meet the attic floor, dropped soffits over kitchen cabinets or bath vanities, and the gaps behind or under kneewalls (the short walls of a finished attic room). Next comes the opening around the furnace or water heater flue, which needs its own method (below). Then the small gaps around wires and plumbing pipes, with caulk for gaps of 1/4 inch or less and expanding foam from a can for gaps from 1/4 inch to 3 inches. Last, weatherstrip and insulate the hatch. Dirty, darkened insulation marks a leak: it has been filtering house air. The steps, with each stop, are on our page about air sealing the attic before you insulate, and the hatch has its own page: sealing and insulating the attic hatch.
Lights, flues and eave vents
Three things in an attic must not be buried.
Recessed lights. ENERGY STAR: “Keep all insulation at least 3 inches away from recessed ‘can’ lights, unless they are rated IC”, and “Never lay insulation over recessed light fixtures”. IC means insulation contact: ENERGY STAR says such a fixture needs no barrier, and to “Check the fixture first for the IC designation before installing insulation.” If you can’t find the marking, treat the light as not rated. ICAT adds “air-tight”: in the guide’s words, lights “which insulation can touch and are sealed to reduce air leaks”. The IC rating alone says nothing about air leaks. For other fixtures, ENERGY STAR’s method is a dam of sheet metal or wire mesh around the light. The 2024 International Residential Code, a model code, says the same in its own terms: unless the fixture is identified as Type IC, no insulation above it or within 3 inches of its enclosure, wiring compartment, ballast, transformer, LED driver or power supply (section E4004.9). Sealing old fixtures is a job ENERGY STAR sends to a professional. Details: recessed lights and insulation.
Flues and chimneys. ENERGY STAR: “Because the pipe gets hot, building codes usually require 1 inch of clearance from metal flues (2 inches from masonry chimneys) to any combustible material, including insulation.” Those are ENERGY STAR’s general figures, not a measurement for your flue. In the 2024 International Residential Code, a model code, the space kept between a gas appliance’s vent and the insulation is at least the clearance to combustibles in the vent maker’s installation instructions (section G2426.4), and a masonry chimney inside the house keeps a 2-inch air space from combustibles (section R1003.18). Which figure applies to your vent or chimney is for your heating technician and building department to say. ENERGY STAR’s method is aluminum flashing sealed with high-temperature caulk, not the expanding foam it uses on other gaps, and a metal dam that holds the insulation back.
Cellulose carries its own federal label. Every container must carry a caution that reads: “Keep cellulose insulation at least three inches away from the sides of recessed light fixtures. Do not place insulation over such fixtures so as to entrap heat.” It must also say to keep the insulation away from the exhaust flues of furnaces, water heaters, space heaters and other heat-producing devices, and to use a barrier that permanently keeps the clearance (16 CFR 1404.4, a Consumer Product Safety Commission rule).
Eave vents. The guide puts this one in capitals: “NEVER COVER ATTIC SOFFIT VENTS WITH INSULATION”. Soffit vents are the intake vents under the roof overhang. Rafter vents, also called baffles, are chutes stapled to the underside of the roof deck between the rafters. They hold a channel open for outside air above the insulation, so the insulation can run right out to the edge of the attic floor. In the 2024 model code, that channel is at least 1 inch between the insulation and the roof sheathing (IRC R806.3). See attic baffles and soffit vents.
How much vent area. The 2024 IRC’s base rule is a net free vent area of 1/150 of the vented attic area (section R806.2). Net free area is the open area of a vent after its screen and louvers; the vent’s maker states it. The smaller 1/300 ratio is allowed only if two conditions are both met. First, in climate zones 6, 7 and 8, a Class I or II vapor retarder is on the warm-in-winter side of the ceiling. A vapor retarder is a layer that slows water vapor passing through; the code sorts them into classes, and the kraft paper facing on fiberglass batts is one of its Class II examples. Second, 40 to 50 percent of the vent area is in upper vents no more than 3 feet below the ridge, with the rest in the bottom third of the attic. Our attic ventilation calculator works out both.
What to add: insulation types for the attic
On an attic floor the choice is mostly between loose fill, blown in with a machine, and batts or rolls laid by hand. ENERGY STAR says you don’t have to match what is already there: “You can add loose fill on top of fiberglass batts or blankets, and vice-versa.” Old insulation rarely has to come out first, either. Of insulation darkened by air leaks, the guide says: “Although the insulation is dirty, it is still okay to use. There’s no need to remove and replace.” Wet, moldy or suspect insulation is a different matter: see when old insulation has to come out. For the materials themselves, see our plain guide to insulation types.
| Type | How it goes in | What to know |
|---|---|---|
| Loose-fill fiberglass | Blown over the attic floor with a machine | The chart on the bag sets the number of bags and the minimum thickness |
| Loose-fill cellulose | Blown the same way | Made from newsprint. On the chart we read, the settled thickness is lower than the installed one. Carries the federal clearance label above |
| Fiberglass batts or rolls | Laid by hand | A layer on top of existing insulation must be unfaced, with no paper or foil backing |
| Spray foam under the roof deck | Sprayed by an installer | A different design, not a top-up. See below |
| Radiant barrier | Foil facing an air space | Not a substitute for insulation: DOE’s archived page says it “has no inherent R-value” |
Batts and rolls. ENERGY STAR calls laying fiberglass rolls the easiest do-it-yourself job. Lay the new layer over and perpendicular to the first, so it covers the tops of the joists, and work from the perimeter back toward the hatch. A second layer has no vapor retarder: “it needs to be ‘unfaced.’”
Loose fill. It needs a blowing machine, which some home improvement stores rent, and ENERGY STAR adds that “it may be wise to hire a professional”. Blown insulation may also need a block at the eave so it isn’t blown into the soffit. Our blown-in insulation page covers the choice between doing it and hiring it, cellulose vs fiberglass compares the two materials, and the steps are in how to blow in attic insulation yourself.
Spray foam and radiant barriers. Foam sprayed on the underside of the roof turns the attic into an unvented space inside the house’s insulated shell. The model code allows that only under a list of conditions that depend on the climate zone and on whether the insulation lets air through (IRC R806.5, 2024 edition). It is a design decision for a trained installer and your building department, and occupants stay out of the house until the installer’s re-entry time. Our spray foam page explains where it fits, and radiant barriers have their own page.
How deep: read the bag, not a rule of thumb
There is no single depth for R-49. The Federal Trade Commission’s R-value Rule requires every package of loose fill to carry a chart with the minimum settled thickness, the initial installed thickness, the maximum net coverage area, the number of bags per 1,000 square feet and the minimum weight per square foot at R-values of 13, 19, 22, 30, 38 and 49, plus the blowing machine and settings behind those figures (16 CFR 460.12(b)(2)). Three makers’ charts at R-49 show how far products differ:
| Product and chart | Bags per 1,000 sq ft at R-49 | Minimum thickness at R-49 |
|---|---|---|
| Owens Corning AttiCat fiberglass (fact sheet 10011287-E, September 2019) | 25 | 17 in. |
| Owens Corning Professional Loosefill fiberglass, a contractor product (10021711-A, March 2026) | 21.5 | 16.5 in. |
| GreenFiber SANCTUARY cellulose (maker’s fact sheet PM-6.3328 Rev C, May 2020, retailer-hosted copy) | 72.6 | 14.3 in. installed, 13.3 in. settled |
Both numbers have to be met. Owens Corning’s AttiCat sheet says that failing to provide both the required number of bags and at least the minimum thickness “will result in lower insulation R-value”. The chart on your own bag is the one that counts, because makers revise them. Our blown-in insulation calculator turns your attic’s area and target into bags and thickness from these charts.
If you hire the work, the same rule gives you a way to check it. An installer must give you a contract or receipt, dated and signed. For loose fill it must show “the coverage area, initial installed thickness, minimum settled thickness, R-value, and the number of bags used” (16 CFR 460.17). The rule also tells installers not to multiply the R-value of one inch by the number of inches installed. Compare it with the chart on the bag.
Do it yourself or hire, and what it saves
ENERGY STAR rates adding attic insulation “a moderately difficult do-it-yourself (DIY) project” and attic air sealing a “challenging” one. Its test is plain: the attic is accessible, not too difficult to move around in, and has none of the stop conditions above. If any of them is there, the professional comes first. This site does not price jobs or name contractors.
Savings. EPA estimates that homeowners “can save an average of 15% on heating and cooling costs (or an average of 11% on total energy costs)” by air sealing and adding insulation in attics, floors over crawl spaces and basement rim joists. That is a model, not a measurement of your house: a typical 1,700-square-foot house built between 1970 and 1989, with air leakage cut by 25 percent and insulation raised to the 2012 code’s levels. By climate zone the modeled saving on heating and cooling runs from 7 percent in zone 1 to 20 percent in zone 4C. It covers the whole package, not the attic alone, and savings vary. Some sellers’ pages promise far more, “up to 50%” for example. EPA’s model gives no average near that in any zone. Our savings and payback estimate applies the model’s figure for your zone to your own bills.
Help with the bill. The federal tax credit for insulation is over: it does not apply to property placed in service after 31 December 2025 (P.L. 119-21, section 70505, amending 26 U.S.C. 25C). Our insulation tax credit page covers what is left. ENERGY STAR suggests asking your utility about rebates before you start. Households with lower incomes may qualify for help through the Weatherization Assistance Program, which states and local agencies run. Owners and renters can apply, and DOE says to expect a waitlist.
After the job: the venting check
A tighter house changes how fuel-burning appliances draw air. ENERGY STAR’s guide: “After making energy improvements that result in a tighter house, there can be an increased opportunity for CO to build up if your gas-burning appliances are not venting properly. Have your heating and cooling technician check your combustion appliances (gas- or oil-fired furnace, water heater, and dryer) for proper venting.” Its attic air sealing page suggests having them tested before the sealing as well as after.
Keep working carbon monoxide alarms. EPA’s carbon monoxide page lists back-drafting from furnaces, gas water heaters, wood stoves and fireplaces among the sources of CO in homes, and passes on the Consumer Product Safety Commission’s recommendation that every home have CO alarms “on each level outside each sleeping area”. Sealing can also trap other indoor pollutants. ENERGY STAR says that after reducing air leaks, EPA recommends a radon test. Sealing is not a radon fix.
Your next step
- Look from the hatch with a flashlight before you climb in. Pebble-like granules, knob-and-tube wiring, wet or moldy spots, or a fan duct that ends in the attic: stop there and call the right professional.
- If it’s clear, do the joist test and measure the depth in a few places you can reach from the joists, toward the eaves as well as in the middle. Note what the insulation looks like.
- Look up your climate zone and compare your estimate with the ENERGY STAR column for it.
- Read the labels: the IC marking on each recessed light and the chart on the bag you plan to buy. Ask your heating technician what clearance the maker’s instructions give for your flue.
- Ask your building department which code edition it enforces and whether your work needs a permit.
- Seal, then insulate, then book the heating technician’s venting check.
Sources checked on 10 November 2026. The model codes (2024 IECC and 2024 IRC) were read on the International Code Council’s site; the code your town enforces may be an older edition or an amended one.
Sources
- ENERGY STAR: Recommended Home Insulation R-Values, retrofit table for existing wood-framed buildings (live page, no date; based on the 2021 IECC; read 10 Nov 2026)
- ENERGY STAR: What to Look For, DIY Checks and Inspections (joist check, depth multipliers, second target table; live page, read 10 Nov 2026)
- ENERGY STAR / EPA: A Do-It-Yourself Guide to Sealing and Insulating with ENERGY STAR, EPA 430-F-04-024 (July 2016)
- ENERGY STAR: Attic Insulation Project (live page, read 10 Nov 2026)
- ENERGY STAR: Attic Air Sealing Project (live page, read 10 Nov 2026)
- ENERGY STAR: Methodology for Estimated Energy Savings, Table 1 (live page, read 10 Nov 2026)
- EPA: Protect Your Family from Asbestos-Contaminated Vermiculite Insulation (last updated 17 April 2026)
- EPA: Carbon Monoxide's Impact on Indoor Air Quality (read 10 Nov 2026)
- 2024 International Energy Conservation Code, Table R402.1.3 and section R402.2.1 (model code, read on codes.iccsafe.org 10 Nov 2026)
- 2021 International Energy Conservation Code, Table R402.1.3, ceiling row (model code, read on codes.iccsafe.org 10 Nov 2026)
- 2024 International Residential Code, sections R806.2, R806.3 and R806.5 (model code, read on codes.iccsafe.org 10 Nov 2026)
- 2024 International Residential Code, sections E4004.8 and E4004.9, recessed luminaires (model code, read 10 Nov 2026)
- 2024 International Residential Code, section G2426.4, insulation shield for gas vents (model code, read on codes.iccsafe.org 10 Nov 2026)
- 2024 International Residential Code, section R1003.18, masonry chimney clearances (model code, read on codes.iccsafe.org 10 Nov 2026)
- FTC R-value Rule, 16 CFR 460.12 Labels (CFR annual edition, 1 Jan 2026, govinfo)
- FTC R-value Rule, 16 CFR 460.17 What installers must tell their customers (CFR annual edition, 1 Jan 2026, govinfo)
- CPSC, 16 CFR 1404.4 cellulose insulation label (CFR annual edition, 1 Jan 2025, govinfo)
- Owens Corning: AttiCat Expanding Blown-In Insulation manufacturer's fact sheet, Pub. No. 10011287-E (September 2019)
- Owens Corning: Professional Loosefill coverage chart, Pub. No. 10021711-A (March 2026)
- GreenFiber: SANCTUARY blow-in cellulose fact sheet, PM-6.3328 Rev C 05/20 (maker's own sheet, retailer-hosted copy)
- PNNL-33270: Guide to Determining Climate Zone by County, Building America and IECC 2021 Updates (September 2022); county list read through our parsed copy
- DOE, archived 22 June 2026: Insulation (Energy Saver; the live page was removed)
- Public Law 119-21, section 70505, termination of the energy efficient home improvement credit (4 July 2025)
- DOE: How to Apply for Weatherization Assistance (read 10 Nov 2026)